Poison Dart Frogs are great animals to keep as a hobby. Their small size and simple requirements allow a wide variety of people to keep them successfully. When the right conditions are met mature frogs of the opposite sex will mate and lay eggs in the vivarium. This article discusses how to care for Dart Frog eggs from when they are laid until when they hatch! The care of the tadpoles after they hatch is discussed in a separate article.

A group of Dendrobates tinctorius “Oyapock” hanging out around their Love Shack.
After putting so much thought and effort into their caretaking it is extremely rewarding to discover your Dart Frogs have laid eggs. Having the frogs reproduce in your vivarium is great reassurance that you are providing them with the right conditions!

A pair of Dendrobates tinctorius “Patricia” hanging out at their breeding location. Notice the male in the front has larger front toe pads, while the female in the rear has a large belly full of hydrated eggs. The female “petting” the male and touching him with her front legs is an easily observed courtship behavior.
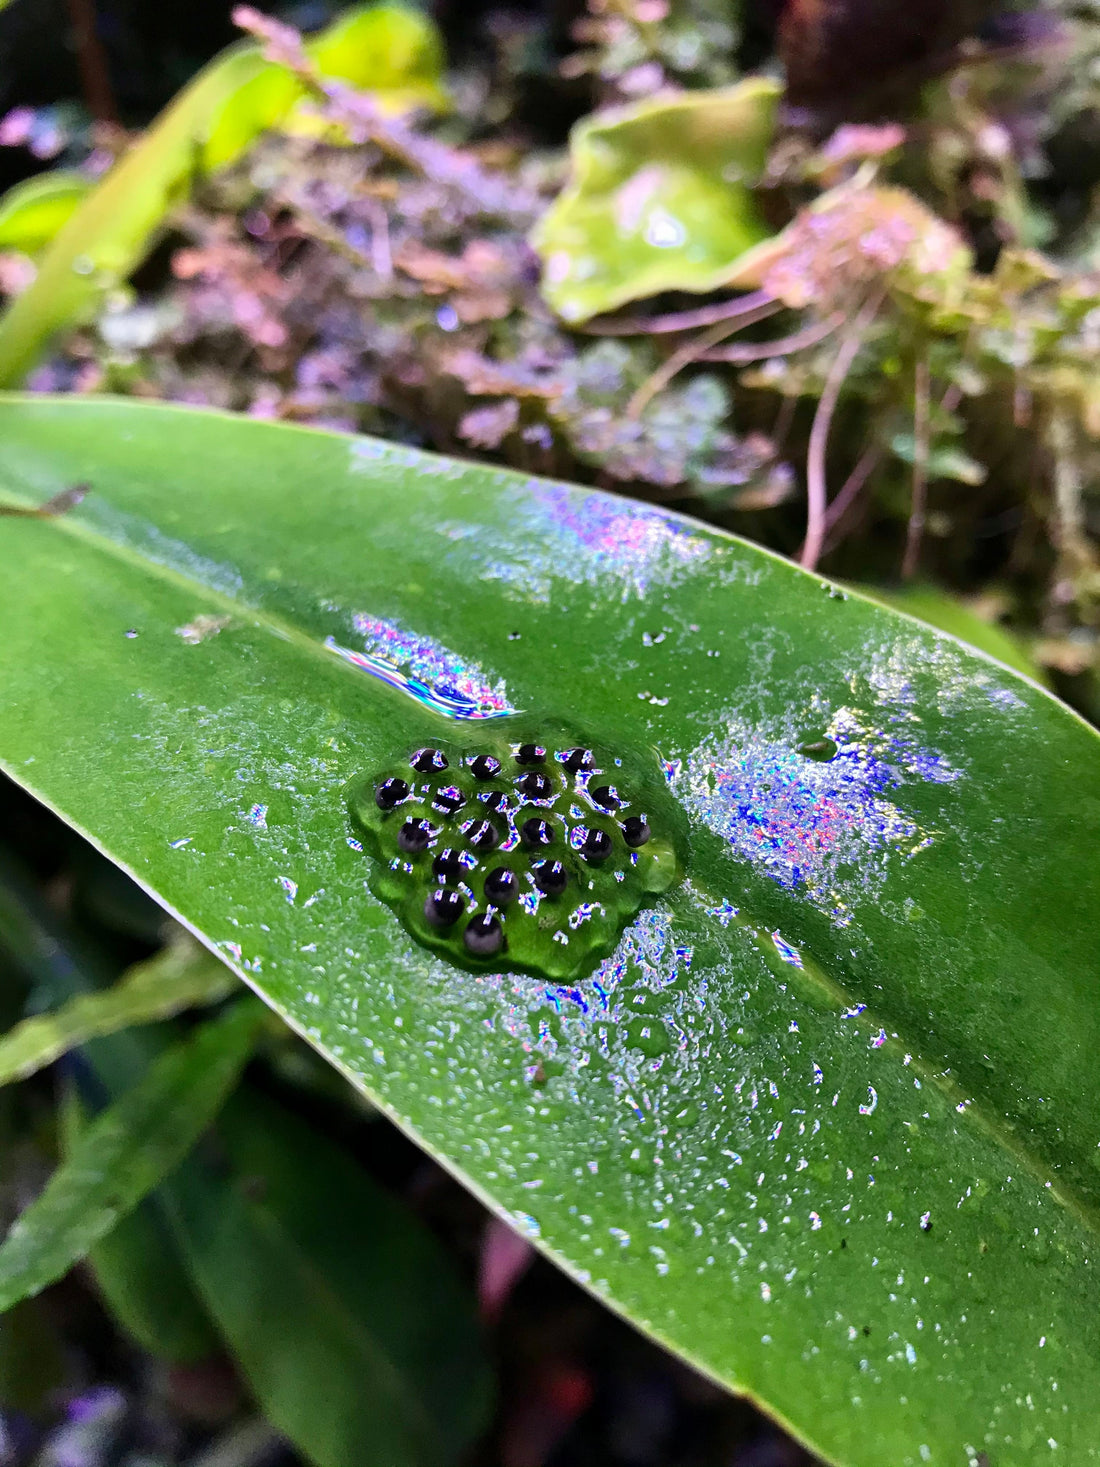
Dart Frogs are relatively good parents, and for most their eggs can be left in the vivarium for the parents to care for as the male will guard the developing eggs. This is actually one method to locate the eggs, as they are often hidden in the plants or leaf litter. However the oversight by the male may reveal their location.

A male Epipedobates anthonyi “Santa Isabel” guarding his clutch of developing eggs.

The male E. anthonyi “Santa Isabel” provides great parental care, and will transfer his tadpoles to a water source upon hatching. Leaving the eggs alone with frogs that do provide parental care will allow the keeper to observe such fascinating behavior!
Some species will provide even further parental care after transferring the hatched tadpoles to a water source by regularly returning to feed the developing tadpole(s) unfertilized nutritionally complete eggs. This process, termed egg-feeding, is done to a varying degree. Some Dart Frogs are Facultative Egg-Feeders, such as many species in the genus Ranitomeya, in which the tadpoles are not reliant on the nutritional eggs. Other Dart Frogs are Obligate Egg-Feeders, such as all frogs in the genus Oophaga, in which the tadpoles rely solely on the nutritional eggs from the female for sustenance.

The eggs of “Obligates” such as these Oophaga histrionica “Red Head” small form should never be removed, as the hatched tadpoles rely solely on parental care in the form of egg-feeding in order to survive.
While the eggs can be left alone, removal of eggs from the vivarium is commonly done for a few reasons. Besides providing the eggs a safe place to develop (some female frogs will eat the eggs of other females in a form of reproduction competition) the removal of the eggs will often encourage the pair of frogs to lay a replacement clutch. Thus the harvesting of egg clutches, which encourages replacement clutches to be laid, will increase the fecundity of the dart frog pair.

While Dendrobates luecomelas are able to be kept in groups they are notorious for eating the eggs of rival females. Often the only evidence of such a massacre is some fragments of egg jelly scattered around the nest site.
Another method to be able to collect eggs from the vivarium is to provide the frogs with a location that they will find ideal to lay eggs. This is most commonly done with a cocohut or a film canister.

A female Dendrobates tinctorius “Brazilian Yellow Head” is easily tempted to lay her eggs on a smooth surface in a sheltered location provided by this Petri dish under a cocohut. Providing ideal nesting sites for the frogs makes locating eggs in a lush vivarium a faster and more successful endeavor.
While cocohuts are typically used for larger frogs such as Phyllobates or Dendrobates and film canisters are typically used for smaller frogs such as Ranitomeya, larger frogs will also use film canisters and smaller frogs will also lay their eggs under a cocohut.

Both of these female D. tinctorius “Giant Orange” are hoping for the male to fertilize their eggs, and they have no shame in squeezing themselves into a film canister.

Smaller species such as those in the genus Ranitomeya may also use a Petri dish under a cocohut, even if provided with the option of a film canister. Note how Ranitomeya eggs are much lighter in color than those of Dendrobates.

The eggs of Chocolate Leucomelas (a leucistic frog) lack the darker pigments normally found in other Dendrobates.
To be able to easily retrieve the eggs a large leaf such as that of Magnolia or Sea Grape is placed under the cocohut, or better yet a Petri dish can be used. The use of a Petri dish has the added advantage of eliminating the need to transfer the eggs, as a Petri dish is an ideal container to have the eggs develop in outside of the vivarium.

Encouraging the Dart Frogs to lay their eggs on a Petri dish allows for easy removal from the vivarium. In this instance both Epipedobates anthonyi “Santa Isabel” (left) AND Phyllobates terribilis “Blackfoot Orange” (right) found this Petri dish to be a suitable spot to lay their eggs!

An upgrade to the film canister method are these purpose-designed TadPools. They have several design features that make them better suited than film canisters, including an extended bottom lip to help collect water and multiple mounting option. However one of the best features is a removable inner sleeve. This allows for eggs to be easily removed from the vivarium.

A clutch of E. anthonyi “Santa Isabel” eggs laid on a broad flat leaf. Note how the lighter-colored yolk of the egg, which is heavier, sits at the bottom.
To transfer the eggs to a container outside of the vivarium you can either remove the entire leaf, cut out the portion of leaf the eggs were laid on, or carefully remove the eggs from the leaf. Removing the eggs from the leaf is the most risky option as the eggs are very delicate. Not only are the eggs prone to internal rupture, but their orientation must be kept the same after their transfer as they were before. The eggs may be rotated and tilted during the harvesting process, but their position after they are transferred must be adjusted to the same as they were before. If the eggs are transferred shortly after they were laid and fertilized the proper orientation can be achieved by ensuring that the heavier yolk (light in color) is on the bottom. Removing the eggs from the surface on which they were laid is a tricky process which can be mastered with practice. A great tool for this is a disposable plastic spoon, with which the eggs can be gently scooped up and then placed into a clean Petri dish.

These eggs were scooped up with a plastic spoon to transfer them. The top and bottom-right eggs are flipped over in this image, clearly showing the cellular division occurring. It is okay if the eggs are rotated when they are being moved, although they should be reoriented into their original position after they are moved.
If the eggs were laid on the Petri dish inside the vivarium it may be wise to clean up the Petri dish before proceeding. A pair of tweezers, a Q-tip, and/or the corner of a paper towel are useful to accomplish this.

If eggs are found on either a living or a dry leaf often times the easiest way to remove the eggs is simply to cut the leaf and place in a Petri dish.

As the eggs develop and the tadpoles grow the frogspawn grows larger than the leaf on which it originally sat. Notice how the tannins from the leaf have tinted the water in the Petri dish.
Whether the eggs are laid on the Petri dish or transferred onto it the next step is to ensure that they remain hydrated. This can be accomplished in several ways. One method is to place the Petri dish in a container, such as a Sterilite Tote, lined with saturated paper towels to keep the humidity high. The method used at NCDartFrogs is to add water to the Petri dish and then place the cover on the dish. It is very important not to add so much water that the eggs become submerged, this will prevent the eggs from receiving enough oxygen! Rather you want to add enough water that the eggs are surrounded, but not submerged. Any purified water can be used for this, including reverse osmosis, distilled, or Spring water.
While the gelatin around the eggs do provide some protection additional measures can be taken to prevent the eggs from going bad. One method is to add a drop or two of Methylene Blue to the water in the Petri dish. Another, more natural, method is to add a small piece of Indian Almond Leaf. The Almond Leaf will leach tannins into the water which lowers the pH and provides natural antimicrobial properties. Around a 1”sq piece of leaf is sufficient for a standard 90mm Petri dish.
Now that the eggs are transferred to a clean Petri dish and antimicrobial procedures are implemented they can now be placed in a protected area to develop. It is important that the eggs are not heated, so they should not be placed on top of the vivarium where the light fixture may heat them nor should they be placed on a window sill where the sun shines (the Petri dish could act as a miniature greenhouse). The eggs should be placed in a safe spot away from children or pets, but ideally a location where they can be checked on without having to lift the dish. As little disruption as possible is the goal. Resist the urge to take the lid off of the Petri dish, as this allows bacteria in the air to infiltrate.

This clutch is rather small, containing only 3 eggs. However the egg in the middle contains identical triplets!

This image shows that all the eggs were fertilized and are developing. Note how the water surrounding the eggs has become tinted by the tannins leached from the Indian Almond Leaf.

Despite being slightly cloudy in the previous image the eggs have continued to develop well. Note how large the gelatinous mass surrounding the eggs has grown. This provides a great deal of protection to the eggs.

This image shows all 3 eggs hatched into 5 healthy tadpoles!

What is more exciting than identical triplets! Quintuplets including identical quadruplets! I wonder if that one quintuplet will always feel like a 5th wheel to it’s identical siblings?
Ideally all the eggs that are harvested are fertilized and develop. However it is not uncommon for one or more of the eggs to stop development and “go bad”. If an entire clutch of eggs goes bad before any development is seen it is possible that the eggs were never fertilized. This is common with young pairs, with practice they will get the hang of it. If given time after multiple attempts all or a large percentage of the eggs in a clutch go bad shortly after being laid it would be advisable to check that the adults are getting proper supplementation. Vitamin A is of particular importance, and it’s supplementation can be increased from once monthly up to twice monthly, or even weekly, in actively breeding frogs. Make sure supplements (especially vitamins) are refrigerated after opening, and replaced after 6 months.

The egg on the left in this image had gone bad early in development, but was not removed. However it did not affect the development of its neighboring eggs. The tadpole on the bottom right has just hatched. The tadpole on the top right has not yet hatched from the vitelline membrane. The tadpole on the top is a candidate for assisted hatching. Having completely absorbed its gills and being tightly constrained by the vitelline membrane there is a chance the tadpole could die if it doesn’t break through the membrane soon. The tip of a 4” zip tie can be pressed down between the body and curved tail of the embryonic tadpole, after which it is pulled to the side breaking the tadpole free from the egg.
In some instances it may be necessary to remove a bad egg to prevent it from ruining the other eggs. One such instance would be if an egg becomes infested with Water Mold. In such instances an egg will appear fuzzy with the fungus. White stringy fungal hyphae can be seen penetrating through the jelly and into the egg, and reaching out across the surface to infect other eggs. In such an instance the entire clutch will succumb unless the affected egg(s) are removed. In the event that bad egg(s) need to be removed the tool of choice is a disposable plastic pipette. The very narrow tip of the pipette should be cut off to enlarge the opening to roughly the size of an egg. The bulb of the pipette deflated, the pipette in a vertical orientation, is pressed down so that the tip of the pipette cuts through the jelly of the frogspawn all the way down to the Petri dish, isolating the bad egg from the surrounding ones. The bulb of the pipette is then released, sucking up the bad egg while leaving the surrounding eggs undisturbed.

In this image the middle-right tadpole did not make it to hatching despite almost complete development. The fact that it is upside down may have something to do with it. The middle-left tadpole is in the process of hatching, while the bottom tadpole has hatched.
The time it takes for the fertilized eggs to develop into hatching tadpoles varies on several factors including the species of Dart Frog and the subtle differences in temperature during their development. An average incubation time is around 14 days.

Shortly before the tadpoles hatch they will absorb their external gills. In this image the bottom tadpole has absorbed its gills and hatched from its egg.
After hatching the tadpoles are quite lethargic. During the day or so after hatching the tadpoles will absorb any remaining parts of its external gills, as well as any remaining yolk. During this time the tadpoles can be left in the Petri dish. A disposable pipette can be used to clean up the dish and remove any jelly and egg remnants. 
Sometimes it may be difficult to discern if a tadpole has hatched due to an excess amount of jelly. A telltale sign the tadpole has hatched is if it is in a strait orientation.
Around a day after hatching the tadpoles can be transferred to where they continue development as a tadpole. Here again the trusty disposable plastic spoon is a useful tool. Make sure to offer a small amount of food no more than 24 hours after the tadpoles hatch.
Now that your tadpoles have hatched be sure to check out the NCDartFrogs article on raising Dart Frog Tadpoles!